
How to Run Pi-hole in Docker on a Raspberry Pi (and Look Like a Tech Wizard)

Introduction
Let’s be honest. You’re here because you’ve heard about Pi-hole — the magical little tool that blocks ads across your entire network — and you want it running on your Raspberry Pi without installing 12 dependencies and sacrificing a goat to the networking gods.
You’re also into Docker, because why not overcomplicate everything for the sake of elegance?
This guide shows you how to run Pi-hole inside a Docker container on your Raspberry Pi, using Docker Compose like a civilised nerd. We’ll also add Portainer if you like GUIs and clicking buttons while nodding thoughtfully.
What You’ll Need
- A Raspberry Pi (3 or 4 recommended, but anything that boots works)
- Raspberry Pi OS Lite (because headless is best)
- Static IP for your Pi (because DHCP is chaos)
- Basic terminal kung fu
Step 1: Update Your Pi (AKA: Don't Skip This Step)
sudo apt update && sudo apt upgrade -y
Good. Responsible. Admired.
Step 2: Install Docker + Docker Compose
Docker
curl -sSL https://get.docker.com | sh
sudo usermod -aG docker $USER
Log out and back in, or just reboot:
sudo reboot
Docker Compose
sudo apt install -y docker-compose
Check it's alive:
docker-compose --version
Step 3: Set a Static IP for Your Pi
This part is critical. Pi-hole must have a static IP to reliably act as your DNS server.
Edit your DHCP config or set a static IP on your router.
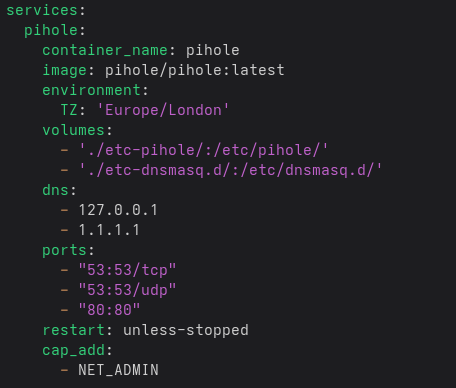
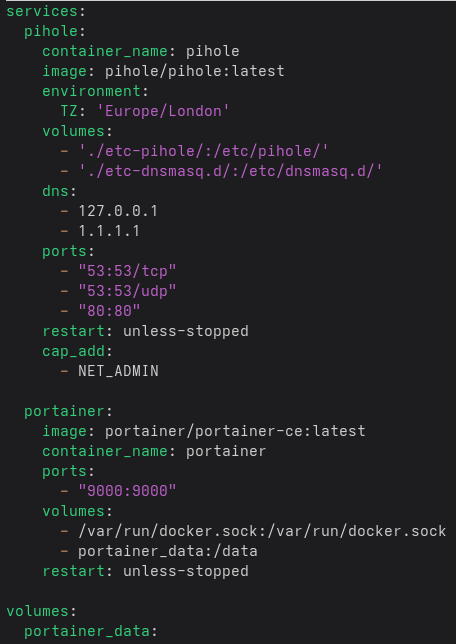
Step 4: Write the Docker Compose File for Pi-hole
Create a folder:
mkdir -p ~/docker/pihole && cd ~/docker/pihole
Create docker-compose.yml using nano or your choice of text editing software:
nano docker-compose.yml
services:
  pihole:
    container_name: pihole
    image: pihole/pihole:latest
    environment:
      TZ: 'Europe/London'
    volumes:
      - './etc-pihole/:/etc/pihole/'
      - './etc-dnsmasq.d/:/etc/dnsmasq.d/'
    dns:
      - 127.0.0.1
      - 1.1.1.1
    ports:
      - "53:53/tcp"
      - "53:53/udp"
      - "80:80"
    restart: unless-stopped
    cap_add:
      - NET_ADMIN
CTRL+X, Y, Enter to save and exit nano.
Step 5: Deploy It Like a Boss
Still in the ~/docker/pihole directory:
docker-compose up -d
If it doesn’t crash, congratulations — you’re now the proud owner of a local DNS sinkhole.
Ensure you set a secure password, something other than Gandalf89:
docker exec -it pihole pihole setpassword
This ^^ is running pihole setpassword inside the pihole docker container, nothing fancy.
Visit it at:
http://<your-static-pi-ip>/
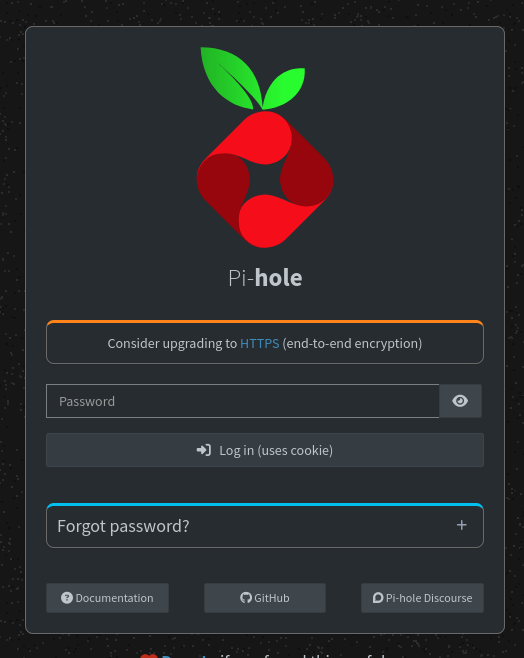
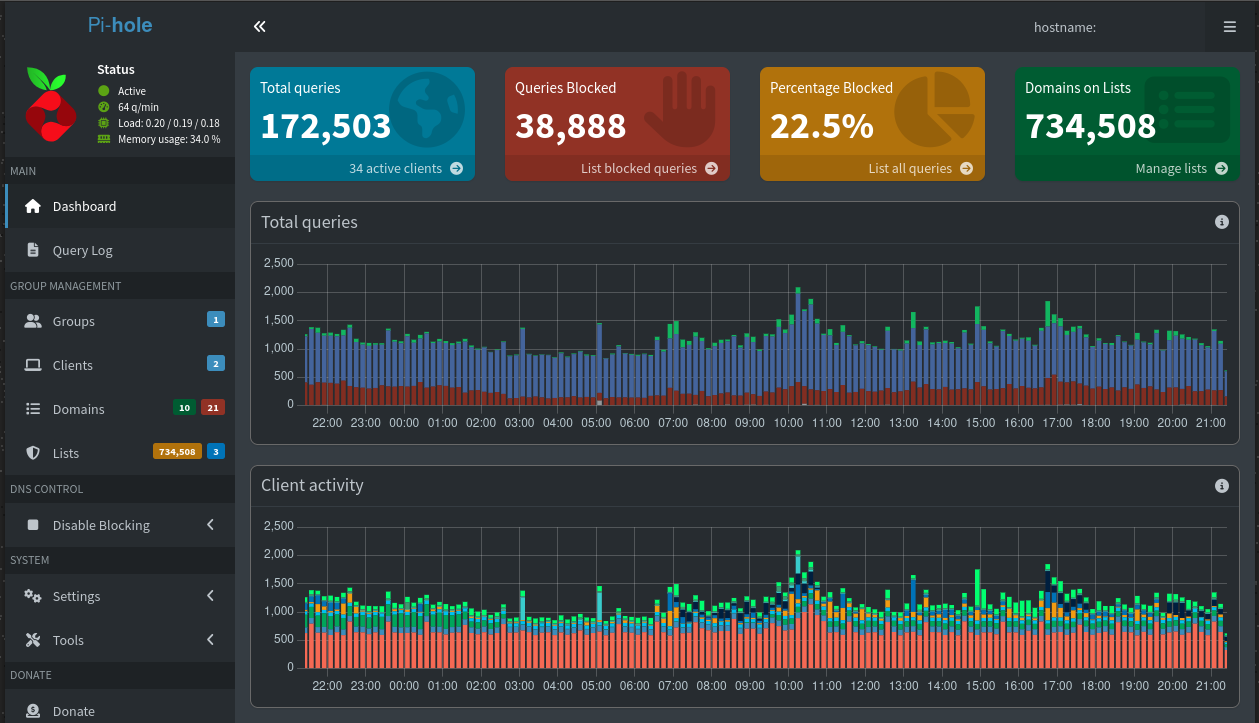
A sneak preview of my running Pi-Hole:
Step 6: Set Your Router’s DNS to the Pi
Head to your router’s settings and set the Primary & Secondary DNS to your Pi’s IP.
Note: If you don't set both anything that is blocked by your Primary DNS will be able
to get through your secondary, making all this a waste of time.
Now all traffic from every device is filtered through your Pi-hole.
Step 7: Blocklists, Because the Internet is a Filthy Place
Once your Pi-hole is up and running, it's time to give it some actual dirt to block. You don’t want your glorious ad-blocking machine sitting there like a bouncer at a wedding reception — it needs a list of troublemakers to keep out.
Enter:
👉 Firebog.net — the fine establishment that curates blocklists so you don’t have to.
You’ll find blocklists grouped by ads, tracking, malware, and straight-up suspicious nonsense. Each list even comes with traffic light icons to warn you how aggressive or safe it is — because yes, even DNS blacklisting has a difficulty setting.
To use them:
- Head to Pi-hole Admin Panel → Group Management → Adlists
- Copy-paste some URLs from Firebog’s list page
- Click “Save and Update Gravity”
- Sit back and watch your Pi-hole go full Gandalf on unwanted traffic: “YOU SHALL NOT PASS!”
For a good balance, start with their “TICKED” green lists. They block ads without breaking half the internet.
Optional: Add Portainer for Fancy Management
Why not treat yourself to some visuals?
Add to your ~/docker/pihole/docker-compose.yml:
  portainer:
    image: portainer/portainer-ce:latest
    container_name: portainer
    ports:
      - "9000:9000"
    volumes:
      - /var/run/docker.sock:/var/run/docker.sock
      - portainer_data:/data
    restart: unless-stopped

volumes:
  portainer_data:
docker-compose up -d
Now go to:
http://<your-pi-ip>:9000
Create an admin user and admire your containers with a GUI that screams DevOps chic.
Troubleshooting Tips
- docker-compose not starting Pi-Hole? Check port 80 isn't already in use by another container (like Nginx).
- DNS not working? Make sure the container actually has port 53 mapped and is reachable.
- Logs on logs: Run
docker logs piholeordocker logs portainerto see what's happening inside the containers.
Final Thoughts
You just turned a Raspberry Pi into an ad-blocking network gatekeeper. It’s containerized. It’s tidy. It’s smug. You could now sit back and enjoy the internet without being asked to buy shoes you talked about once near your phone.
Give it a week and you’ll be containerizing your toaster.